Buyers should specify an ODM desktop organizer set as one coordinated system, not three generic baskets. Lock the role and usable opening of each piece, outside and inside dimensions, divider positions, set composition, material and color reference, labels, pack-out, carton plan, sample evidence, QC checkpoints, and quotation assumptions. Test the proposed contents in every compartment before approving production.
1. What job must the complete organizer set perform?
Start with the destination channel and the contents, not a request for a small organizer. A retail buyer may need a coordinated desk set for stationery, a brand may need vanity compartments for packaged accessories, and an ecommerce buyer may need one boxed set with a clear unboxing order. These programs can use a similar silhouette while requiring different openings, labels, protection, and selling-unit decisions.
Write one use statement for the complete set and one for each component. Name the objects that will be placed inside, their largest relevant dimensions, how shoppers remove them, and whether the product will be displayed empty, loaded, or partly loaded. A request such as “three organizers for office use” leaves the supplier to guess which item belongs in which compartment and whether the open face, divider count, and depth are usable.
The desktop storage category is useful for creating a visual shortlist. Treat its products as references for shape, material, and merchandising direction. Do not treat the category as approval of a new program’s component count, measurements, fit, color, pack-out, or commercial terms.
2. How can buyers use JZ10169 without copying assumptions?
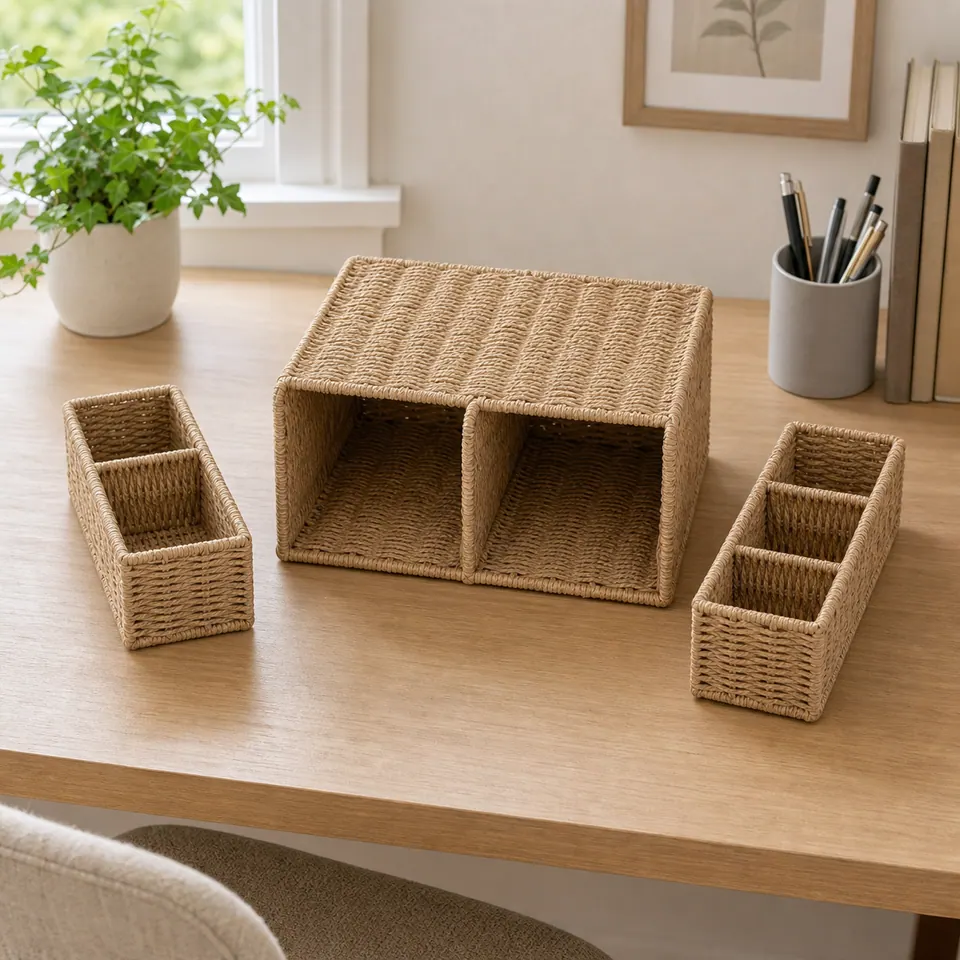
The current JZ10169 three-piece desktop organizer set provides a concrete starting reference. Its CMS record identifies natural tan paper rope, one rectangular organizer with two open cubbies, one two-compartment basket, and one three-compartment basket. The visible edges are wrapped, and the pieces are presented as a coordinated desktop set.
The recorded outside dimensions are 27 × 25 × 15 cm for the two-cubby organizer and 11 × 25 × 8 cm for each divided basket. Those measurements describe this catalog reference; they are not automatic specifications for a buyer’s order. Confirm the measurement points, usable internal openings, divider thickness and position, intended contents, and any requested changes before asking for a production quotation.
Use the reference to state what remains unchanged and what must be developed. For example, a buyer might retain the three-piece architecture but request a different color, compartment allocation, label location, or selling unit. Every change can affect the sample, packing arrangement, cost basis, and achievable quantity. Require the supplier to identify consequences instead of assuming that a visual change has no operational effect.
3. Which dimensions make a compartment usable?
Outside dimensions help with shelf, desk, and carton planning, but usable openings decide whether the proposed contents fit. For every cubby or divided basket, mark the clear width, clear depth, clear height, divider position, entry opening, corner profile, and any taper. Use an annotated image so the buyer and supplier measure the same points.
Build a contents matrix before sampling. List each intended item, its orientation, the compartment assigned to it, clearance needed for fingers or packaging, and the condition in which it will be tested. If the program holds pens, cards, bottles, remote controls, or packaged accessories, use the buyer-controlled item or drawing rather than a verbal category. A piece can accept an item and still be inconvenient if the opening, divider, or retrieval path is wrong.
Separate critical fit dimensions from appearance dimensions. A cubby opening or divider location may control use, while an external handmade contour may be compared with the approved sample and a project-specific range. Do not import a tolerance from a rigid plastic organizer or an unrelated basket. Ask the supplier to propose an achievable measurement method and range for the sampled construction, then record the approved result.
4. What should the component specification table contain?
Use one table to connect the reference, the buyer’s decision, and the evidence needed for release. Replace the example contents with the real assortment before sending the RFQ.
| Set component | JZ10169 reference | Buyer must define | Sample evidence to retain |
|---|---|---|---|
| Two-cubby organizer | One piece; recorded outside size 27 × 25 × 15 cm | Open-face direction, usable opening of each cubby, divider position, contents, access and shelf orientation | Annotated measurements, empty and loaded views, divider and edge details |
| Two-compartment basket | One piece; recorded outside size 11 × 25 × 8 cm | Divider ratio, usable depth, assigned items, retrieval space and display face | Top, side and interior views with the approved contents |
| Three-compartment basket | One piece; recorded outside size 11 × 25 × 8 cm | Three clear openings, divider positions, item allocation and label relationship | Compartment measurements, loaded view and divider alignment |
| Complete retail set | Three coordinated pieces | Included components, colorway, selling-unit name, label set, unboxing order and pack-out | Set count, packed sequence, retail presentation and carton identification |
Add a disposition column during review: approve, conditionally approve with named open items, or revise and resubmit. A single approval for appearance should not silently release fit, labels, packing, or the commercial basis.
5. How should material, construction, and color be controlled?
“Paper rope organizer” is not a complete construction specification. Record the visible woven material, internal support or frame where applicable, panels, dividers, base, wrapped edges, joins, attachment method, labels, pads, and any part that affects shape or use. Request close photographs or a simple drawing of each transition that cannot be judged from the main scene image.
Use the paper rope category to identify a visual material and color direction, then tie the chosen reference to a controlled sample. State which faces must align, which edge treatment is expected, how dividers meet the surrounding panels, and which visible conditions require correction. Do not turn the material name into an unsupported claim about strength, safety, sustainability, or service life.
For color, provide a physical reference, approved sample, or controlled color target and explain the viewing condition. If multiple colors form one assortment, state the quantity split and review them together. Keep body color, edge wrapping, dividers, label, printed insert, retail pack, and carton identification on the same revision list so a late artwork or color change does not bypass sample review.
6. What must the sample approval file prove?
Review the sample as a working three-piece system. The file should contain the specification revision, component list, actual measurements, empty and loaded photographs, details of openings and dividers, color and construction references, label proof, pack-out sequence, comments, owner, date, and release status. The sample should be traceable to the quotation and later inspection criteria.
Use the real proposed contents in every component. Check whether each item can be inserted and removed without forcing, whether tall items interfere with the cubby above, whether smaller items disappear below an impractical divider, and whether the set remains understandable when displayed partly loaded. These are observable project decisions, not universal performance claims.
The pre-production sample review guide provides a broader approval sequence. For this program, add a set-completeness gate: the two-cubby organizer, two-compartment basket, and three-compartment basket must match the approved count, orientation, color, labels, and packing relationship. Do not approve one attractive component while leaving the other two undefined.
7. How should the retail set and export pack be planned?
First decide what the shopper receives. Options may include one complete three-piece set, individual components sold separately, or a mixed assortment, but the quotation and artwork must name the chosen selling unit. Record the SKU, component count, colorway, label set, barcode ownership, inserts, unit protection, and whether any props shown in images are excluded.
Create a packing sequence with photographs or a diagram. State whether the divided baskets sit beside, inside, or separately from the larger organizer; where protective material is placed; which woven faces or wrapped edges must not rub; and how the shopper encounters each piece during unboxing. Confirm the first packed sample before the carton arrangement becomes the pricing baseline.
Have the supplier return a carton-data sheet covering set count, verified dimensions and weights, assortment coding, marks, and any pallet constraints. Keep transit validation separate: if the program calls for checks for abrasion, crushing, moisture, drops, or other hazards, define the procedure, units, pass-or-fail criteria, and decision owner in the project specification. A visual pack review alone does not support a general shipping-performance statement.
8. Which QC checkpoints should follow the approved sample?
Build QC checkpoints from decisions that are visible or measurable. Before assembly, confirm the controlled material and color reference. On the first finished set, check component count, outside and usable dimensions, cubby openings, divider positions, edge wrapping, base condition, joins, and the assigned contents. During production, use the agreed sampling plan to review the same critical features and defined appearance conditions.
Before packing, verify labels, barcode data, color assortment, component pairing, and set identity. After the approved pack-out, confirm that every component is present, protected, oriented correctly, and matched to the carton mark. Record deviations against the approved specification rather than using broad comments such as poor shape or wrong size.
The buyer and supplier should agree who measures, what tool and placement are used, how results are recorded, and which conditions block release. If a divider, frame, material, label, or packing method changes after sample approval, route the change back through the responsible owner. A replacement that looks similar may still alter opening size, appearance, cost, or pack-out.
9. How should buyers compare MOQ, timing, and quotations?
Request project-specific answers only after the set architecture and pack basis are clear. Quantity can be affected by material and color preparation, component count, quantity split, labels, printed packaging, and carton purchases. Ask the supplier to separate the finished-set quantity from any component or branded-material purchase minimum and to explain how unused custom materials would be handled.
Sampling and production schedules should name their start conditions and approval dependencies. The useful question is not “What is your standard sample time?” but “When can this revision start after contents, dimensions, color, artwork, pack-out, quantity, and required evidence are confirmed?” Keep buyer review time, revisions, and any external approvals visible rather than hiding them inside one date.
Normalize each quotation to the same revision, component count, quantity split, label and packing scope, and inspection basis. Put currency, payment schedule, offer expiration, requested Incoterm with named place, and exclusions in a separate commercial comparison sheet. The OEM and ODM project page can organize customization inputs. Once the specification and open-question list are complete, use the structured RFQ page. Ask each supplier to list deviations, dependencies, and alternative constructions explicitly.